


Cooking with Kata — Pan pizza
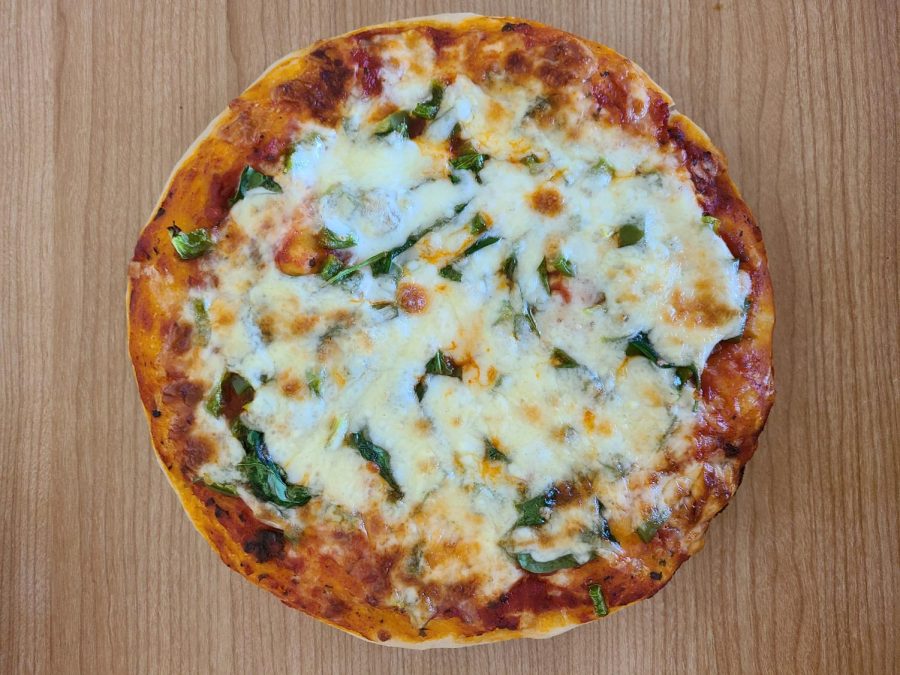
BUILD YOUR OWN — Homemade pan pizzas are super easy to make and you can add whatever combination of toppings you want. I made mine with peppers and spinach to feel like I was eating more veggies.
September 21, 2022
This is a recipe that might seem somewhat complicated and yes, it does take some planning ahead, but most of the time spent on this recipe is waiting for the dough to rise. You could easily work this recipe into your day and have homemade pizza dough ready to go the next night.
Ingredients:
2 cups flour
¾ teaspoon salt
½ teaspoon yeast
¾ cup warm water
1 tablespoon (plus more for pan) olive oil
Cheese, sauce and toppings of choice
Directions:
In a large bowl, mix together the flour, salt, yeast, water and oil. I recommended using a spatula or spoon to start mixing the ingredients together and move to kneading with your hands after it starts to form a rough dough.
You do not need to actually knead the dough to form gluten — we are doing this the lazy way. Once the ingredients come together, let the dough sit for about five minutes at room temperature while covered with a towel.
After five minutes (or more — I honestly forgot about this dough and talked on the phone for 25 minutes before I remembered I was making pizza and it still turned out fine), you are going to perform a ‘stretch and fold’. I do not know if this is the official term, but it describes the process quite well.
Take one side of the dough, stretch it away from itself as much as you can and then fold that part over the top of the dough ball. Repeat this with all four sides of the dough and you will notice more tension forming in the dough as it becomes harder to stretch. Let the dough rest for approximately five more minutes before doing the stretch and fold process again.
One of my favorite things to do when making any type of dough that needs to rise is to set my timer for the rising dough and then use that same timer for a set studying hour. It helps structure my day without being too overwhelming and I feel twice as productive.
After a total of four stretch and fold sessions with five-minute breaks in between, leave the dough covered on the counter for another 40 minutes. This is one of those prime the-dough-needs-to-rise-so-I-will-set-a-timer-and-study-for-that-same-amount-of-time situations.
When the timer goes off, finish whatever chapter you were on and then move the covered dough to the fridge. I personally make this dough in the evenings so it can chill in the fridge overnight, but this is a super forgiving recipe. It needs to be in the fridge for at least 12 hours, but you can leave it in there for up to three days if your professor assigns you a surprise essay due within the next 24 hours and you suddenly have no time to bake.
When you are ready to make the pizza, you do have to plan ahead. I recommend taking the dough out of the fridge around three hours before you want to have it ready. The good news is that two hours of that time can be spent studying or even going for a walk to enjoy the fall colors.
Before you can start the timer though, prep an oven-safe pan or baking sheet with oil and gently press your dough into the dish. If your pan is a little small, you could divide this dough into two pieces and make two pizzas as well.
The dough might be a little cold from the fridge and therefore not spread nicely to the edges of the dish. If this happens, let it sit for 15 minutes or so before trying again.
Once it is in the pan to your satisfaction, cover it once again and leave it on the counter with the timer running for two hours. I would spend one and a half hours of that time living your best life, but when 30 minutes are left on the clock come back to preheat the oven to 450 degrees Fahrenheit and start prepping your toppings.
You can really put anything on your pizza (do not let anyone judge you for your pizza toppings — life is too short for that) but have your toppings ready to go when that timer goes off. Start with a layer of cheese. I will say it again for the people in the back. Start with a small layer of cheese on the dough before adding your sauce.
This extra cheese layer will help protect the dough from getting too soggy when it bakes, and do you really need more reasons to add extra cheese? I will warn you not to add too much cheese in this layer though, or else the toppings might not stick as well.
You can then proceed to build your pizza as expected: sauce, toppings and more cheese to finish it off. Hopefully your oven is also preheated by now and you can put the pizza in for 18 to 22 minutes. It should come out slightly golden on top and, if you check the bottom of the crust with a spatula, also golden on the bottom.
You can keep the pizza in longer if you like a crispier dough, but this crust is naturally a magical experience and will be good so long as you do not burn it. Leave it in the pan for a few minutes after it comes out before transferring it to a wire rack or a cutting board.
I recommend leaving it to cool down for a few minutes before trying it. I did burn the roof of my mouth eating this pizza five minutes out of the oven, but it was worth it.
Making pizza dough from scratch, especially when it takes over a day to actually eat the pizza, may seem like a lot of extra effort. And honestly, it is, but fresh pizza straight from the oven is such a different experience from ordering delivery from Domino’s. I highly recommended trying this just once to get the full experience. This is a pretty forgiving recipe, and it is surprisingly hard to screw up a pizza.